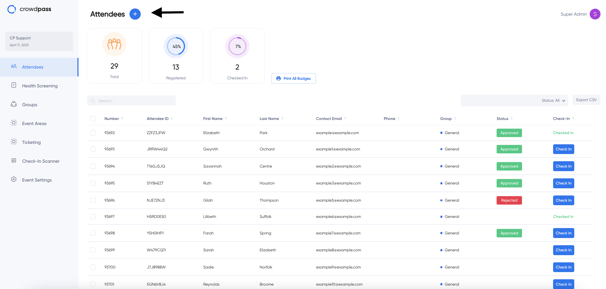
After you create an event, you can add attendees to your event by uploading a list of attendees to CrowdPass.
Alternatively, event organizers can use the link provided by CrowdPass to invite attendees to register, and once they do, they will be added to the attendee list.
Your event needs will determine which option is best.
Reasons you may want to upload attendees to your event:
- If you have a specific list of attendees allowed to register.
- If you have Groups and want to upload and assign attendees to Groups easily.
- Email attendees directly from support@crowdpass.co.
- Easily track which attendees have and still need to complete registration. (Track attendees through the 'Status' column).
Below are the three ways to add attendees to CrowdPass. Each option requires you to click the blue + sign next to Attendees to begin.
1. Add attendees one at a time
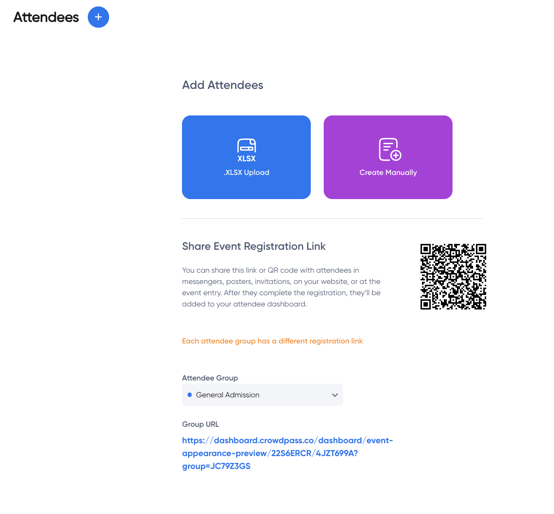
Click the purple Create Manually button and fill out the attendee's information.

Checking the box 'Invite attendee to register.' will send an email from support@crowdpass.co inviting attendees to register. The email sent is written in Event Settings. You can learn more about attendee emails here.
2. Add attendees with .xlsx upload with custom registration questions/answers
Use the blue button to Bulk Add Attendees if your event has custom registration questions and you want to upload answers to those questions from a .xlsx file.
Custom registration questions are set up in your Event Settings under Registration.

Say I have students who filled out the information in another application or sheet. I can add that information to CrowdPass by following the steps below.
1. Save information in a .xlsx file

2. Click the blue button .xlsx upload
The .xlsx file I used for this article is linked here.
3. Click the button labeled Drag & drop file or click here to upload and choose your file
4. Click the sheet you want to import from. Usually named 'Sheet1.'

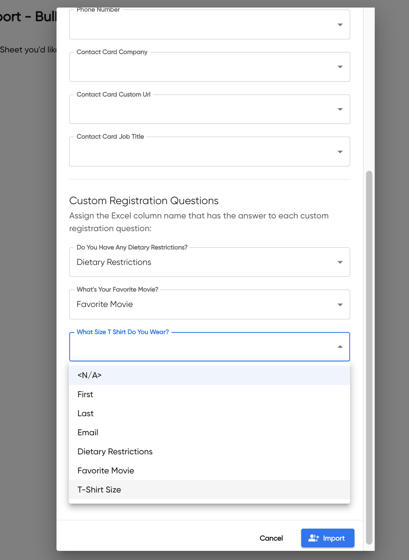
5. Assign columns in the sheet to the attendee attributes in CrowdPass. The drop-down menu reflects the columns in your .xlsx sheet.
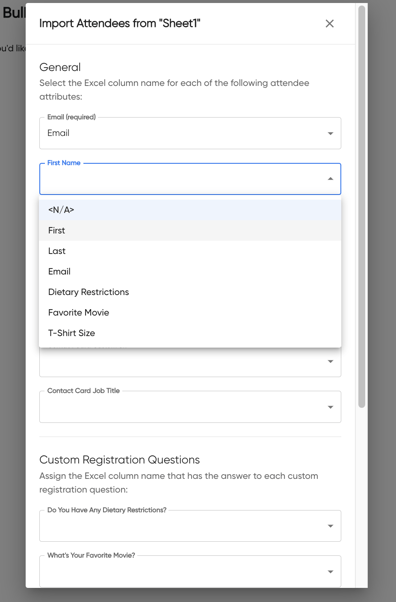
This is where the custom registration questions come into play. Do you notice that the questions below are the same registration questions in the event setting above? You can attach those questions to columns in the .xlsx sheet.
6. Assign attendees to a Group
If you have multiple groups and a lot of attendees, I recommend separating attendees into different .xlsx sheets based on Groups. That way, you can bulk-upload attendees and assign them all to groups in the upload process instead of afterward.
7. Click Import
8. Go to attendees. All attendees from the .xlsx file have been created.

Notice that only some of the registration questions were answered. That's because they were left blank in the file I uploaded.
Repeat the process if you want to fill in those answers for attendees. Fill in the answers in the .xlsx sheet and reupload. Keeping the name and email exactly the same as in CrowdPass will update the attendee's information and answers to the registration questions.
We know that event needs vary from event to event. That's why CrowdPass gives a variety of solutions for event organizers to upload attendees.
We hope this article helps! Please feel free to contact support@crowdpass.co with any questions.